Showing posts with label ~wedding. Show all posts

Thursday, December 9, 2010

Barakallah to Atun..


The wedding card was specifically ordered in blue. I tried to find the perfect baby blue colour card but unfortunately to no avail. Instead I only got this card which is kind of tiffany blue. I wasn't so keen with the colour at first. But the more I work on the design, the more I fell in love with this colour. In fact, tiffany blue is fast becoming the chosen theme for weddings nowadays. They're rare, unique and there's something romantic about it. Have a look at the wedding photos of this girl. I absolutely adore all the deco until the itsy bitsy details. So gorgeous! I just recently found out that she's a wedding planner as well. Ah, no wonder everything looks perfect.


A garland of roses, never fails to delight me. I used Versafine in onyx black to stamp the collage behind and I must say that I am absolutely satisfied with this brand. I've been looking for the best black ink for me in the market and I must have read hundreds of review from around the world. So basically I chose Versafine because it won't bleed hence it's suitable for coloring inside the images even with watercolour. It captures every fine details on the stamp and it's very clear. I absolutely want vivid black. Some ink pad just didn't produce the 'clearest' black. Also it's oil-based hence it's permanent. Yet it won't leave stain on my stamps. It's really easy to wash out.


Love is a many splendour things.

Wednesday, September 1, 2010

The countdown has begin =)


It's my wedding in one month! Ooh, so happy and excited. Who wouldn't eh. Hee. But most of all I'm so thankful to God that I met him. He has been so sweet and caring and nice and gentleman and patient with me. Not just to me, but to my family as well. I'm praying for a life of happiness ahead. I want to share all my joys and sorrows with him.


I made this card for my fiance. Hope he receive it first before reading this post though ;)


I looked over the net to find a nice 'number 1'. Kind of flowery, romantic and victorian but couldn't find any. So I made this using PhotoImpact. Phew, quite a number of try. Alas I'm really satisfied with this.

Pray for me and wish me all the best eh ;)

Sunday, August 22, 2010

Something blue?


I've heard the phrase somewhere but I've never quite understand what does it mean. Then it was uttered by nanny Fine in The Nanny during her wedding day. She went panic when she didn't have something old something new, something borrowed something blue. By then I get it that the phrase has something to do with wedding. But what exactly is still unclear.

Lo and behold, I met the phrase again on my 7Gypsies wedding rub on. I didn't notice it before. It was accidentally that I made a blue wedding card for I want to use the blue heart shaped bead. Then I saw the phrase, I was like 'Hey, perfect!'. Naturally being a curious person, I decided to google it up. So, it was actually a modern tradition in the customs of British wedding. It is considered as good luck for brides to wear or carry 'something old something new, something borrowed something blue'. Ok, so nanny Fine married the handsome brit Maxwell Sheffield. In her case, the something blue was an old earring given by Val which she actually borrowed from Fran sometime ago but never return it yet. Lol. Get it? It was old, it was newly returned, it was borrowed and it was blue. Haha.

Ah well, you could read more on the phrase here and here.


Saturday, August 14, 2010

Soft and sweet pink


To me this is a sweet card indeed. I really adore soft pink and wedding. Much like I adore white and wedding. In this card, I assemble a few shades of pink. The base cardstock is the softest followed by a brighter pink paper which I inked the edges with white stamp pad. Then followed by the patterned paper with circle shapes in pink and chocolate.

The wordings were from 7 Gypsies wedding rub on and I stamped the pink circle cut out with collage pattern in white before rubbing on the words. I also add eyelets each and am so excited using it for the first time =)


I just love the pink roses. And I made it myself! Learned it from here. It is awesome since I really have a thing for roses and now I'm able to make it from any colour and any type of paper to embellish my project. The blogger has many other tutorials as well and it is very generous of them to share. Their art craft is amazing too. Do check out the awesome blog.


I'm so addicted that I make plenty in a go for keepsake. So it'll be easier to use whenever I want to. Oh sweet pretty roses=)

Tuesday, June 15, 2010

~It's wedding season again


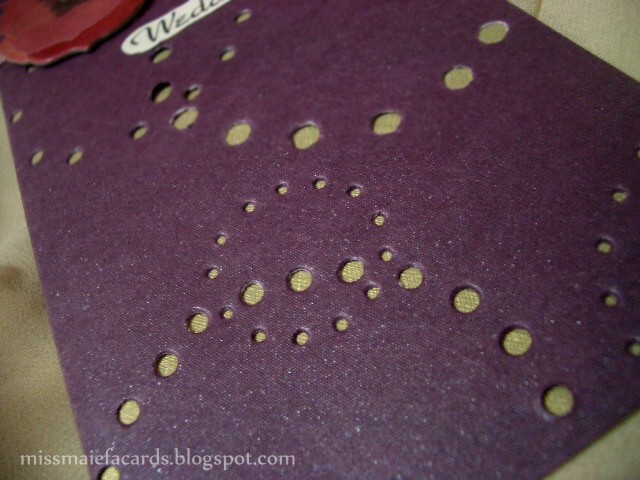
Yes, it's school holiday in Malaysia and it means wedding bells around each corner. The scent of love and joy. Plus the scent of yummy foods as well. Hehe. I make this wedding card for my distant niece who got married last week. It's in deep purple! =) The shiny cardstock is a new type of card that I found at the bookstore. Really beautiful and makes a nice card.


I'm still in circles/ round/ polka dots mood. The excitement is further enhanced since I bought my first ever Making Memories Instant Setter. It punches holes and sets eyelet wherever I want it! I've been eyeing it for some time. I still have to buy the cute colourful eyelets to use with the eyelet setting but right now I'm fully enjoying the puncher kit. There are three sizes of hole punch tips available. I got the idea to make this kind of card from a handmade card magazine.

After punching the holes, I paste a piece of green patterned paper behind. Then cut a piece of mauve grossgrain ribbon, paste it and add on top a nice layered glittery poppies. It's from Blossomwood I think. The wordings are printed on a pearly white cardstock.

It's best to punch from in front of the card to get a clean cut result so I draw the circles inside and I marked first with the setter inside. Then only I punched through from in front of the card. There's a lot of ideas swirling in my mind now so watch out for more circles card from me. Hehe.

There are lots of eyelet setter available but currently I'm satisfied with mine. Very costly though, probably the most I spend for card making stuffs. Still I love it. Like my dear fiance said, it can do wonders. Hehe. If you still have no idea what an eyelet setter is, you can watch a tutorial here.

Sunday, March 15, 2009

Soft and sweet blue..


For my friend's wedding last week, I chose the colour blue since it's her favourite colour and also her wedding theme was blue. So I'm very proud to say that the card really really fit in the wedding=p This is the first time I used my new border punch and they're wonderful! But it's a bit crooked because I tried to punch two-layered and they got stucked. However I managed to fix the card so that it's not that obvious. See if you can find it. Hehe.

The stock card I used were glittered and then I pasted small hearts using the same colour on the upper two-third of the card. It makes the card look embossed and very nice. I'm loving it=)


Inside I inserted soft blue paper and I wrote simple inscription on white patterned paper, adorned with punched pearl white flowers.


Here's the card in it's transparent handmade envelope, slipped behind the paper fan on the wedding gift from us. Oh, he wrapped the wedding gift and make the paper fan himself. So sweet. Hehe.


::Pictures by Aryuel and edited by me=)

Monday, December 22, 2008


Two souls with but a single thought,
Two hearts that beat as one.
~Franz Joseph von Munch-Bellinghausen


Hmm..sweet words. Meaningfull eh? Hehe. With so many wedding taking place, I'm in such a romantic mood=p This is yet another design of wedding card that I made for my fellow friends. The cards are the same except for the theme colour. The blue card was given to Mariyatul as she really loves the colour blue (how delighted she was when she received the card! ~o^_^o~ ). While the sweet pink one was given to Suraya as it really suits the petite and cute girl she is=)


The cards were done in a hurry so they might looked kind of bare. I simply punched flower shape on the front cover to expose the colour of the paper inserted inside. Just a simple trick to make your card more interesting=p The wordings were computer generated and pasted double layer on white patterned paper and shining kind of knead paper. But what I really like is the butterflies which I had to sew on the card. They looked really sweet..two hearts, two souls=p Wish I'd done more with the stalk though. Hehe.

And so this is how the cards looked like in their sweet transparent handmade envelope=)


Tuesday, November 18, 2008

Simple yet elegant wish~

Another wedding card with the wish 'Selamat Pengantin Baru' in front. This is a really simple design yet I think it looks really sweet=) Still using the shimmery white card and at first I thought of lots and lots of heart in gold. But then I found this really nice blue knead paper which looks really good on the white card. So I decided to give it a try and I really like the end result. The edges are crinkle cut and it was really fun punching and pasting the blue hearts. Did it while watching Amazing Race. Haha=p

The card came with a transparent handmade envelope and I put a blue heart at the back of the envelope too. Heee~
This is how it'll look like in the envelope and I think I shall try with different colour for the hearts as I really like this design=)

Wedding bells!=)

It's school holiday. Yey for the kids! Hehe. School holiday means it's the wedding season too. Ooh, lots of love everywhere=) What better way to congratulate the newly weds than with special handmade wedding card. This is the first one I made this year. I'm still using the shimmery card with a touch of gold ribbon.

I really love the gold and silver heart, carefully drawn and cut. I chained it to each other as a symbol of union. See how they sparkle when they catch the light=) The wordings are written down by hand using a special gold ink pen. And also there's two small heart attached to the ribbon. Not forgetting on the envelope too. Hmm, sparkle everywhere=p

I also wrote the inscription inside, paste on a layer of silver paper, crinkle cut edges and added with small hearts too.

The card came with a transparent handmade envelope and this is how it'll look like. I think I'll give it to a friend whose due to wed next week!=)

 
template by suckmylolly.com flower brushes by gvalkyrie.deviantart.com